 }
}
Crawling websites is not quite as straightforward as it was a few years ago, and this is mainly due to the rise in usage of JavaScript frameworks, such as Angular and React.
Traditionally, a crawler would work by extracting data from static HTML code, and up until relatively recently, most websites you would encounter could be crawled in this manner. This was the same for web crawlers like Sitebulb AND a search engine like Google.
However, if you try to crawl a website built with Angular like this, you won't get very far (literally). In order to 'see' the HTML of a web page (and the content and links within it), the crawler needs to process all the code on the page and actually render the content.
Rendering is a process carried out by the browser, taking the code (HTML, CSS, JS, etc...) and translating this into the visual representation of the web page you see on the screen.
Search engines (and crawling tools like Sitebulb) are able to do this en masse using a 'headless browser', which is a browser that runs without the visual user interface. This works by building up the page content (i.e. 'rendering the page') then extracting the HTML after the page has rendered.
The key difference between extracting HTML before the page is rendered and after it is rendered is the influence of JavaScript.
Why? Because when JavaScript code is fired, it can drastically change the page content. On sites that are particularly JavaScript heavy, most or all of the content will be changed by JavaScript. Since Google crawl JavaScript now, you need to make sure that your website does not suffer from rendering issues if you expect it to show up on Google search.
Plenty of sites do not rely on JavaScript in this way, but when you encounter a site that does, there are certain things you need to take into account when setting up the crawler.
Table of contents:
- How to crawl JavaScript rich websites
- How Google handles rendering
- How Sitebulb handles rendering
- Side effects of crawling with JavaScript
- How to detect JavaScript websites
- How to detect JavaScript dependence
- Further reading
How to crawl JavaScript websites
This guide contains a lot of theory and context which will aid your understand, but if you simply want to get on with crawling, you can follow this advice and be on your way:
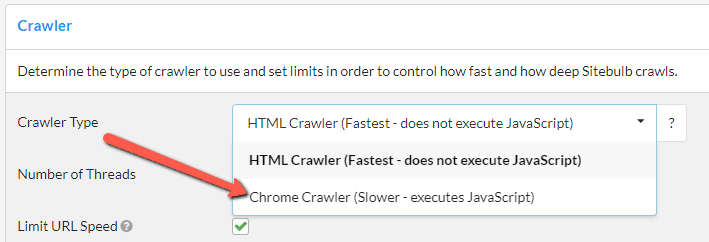
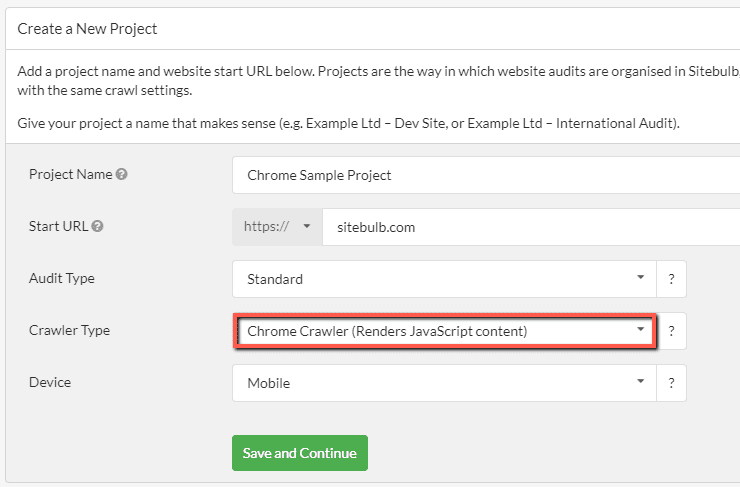
To crawl a JavaScript website, simply select the Chrome Crawler from the 'Crawler Type' dropdown when starting a Sitebulb project (if you don't use Sitebulb yet, you can start your free trial now):
Psssst! Sitebulb doesn't charge anything extra for JavaScript crawling. This is one of the reasons we're such an appealing alternative to JetOctopus, Botify, Lumar and other crawlers.
How Google handles rendering
Over the years, this rise in the prevalence of JavaScript has caused Google various headaches. For a long time they struggled to render JavaScript-heavy pages at scale, and their default advice was to utilize server-side or pre-rendering, instead of client-side rendering.
Since 2019, they have implemented an 'evergreen Googlebot', which means that Googlebot runs the latest Chromium rendering engine and keeps it constantly up-to-date (incidentally, we do exactly the same here at Sitebulb, so crawling with Sitebulb reflects exactly what Google sees).
Nowadays, rendering is built into Google's crawling and indexing process at a fundamental level;
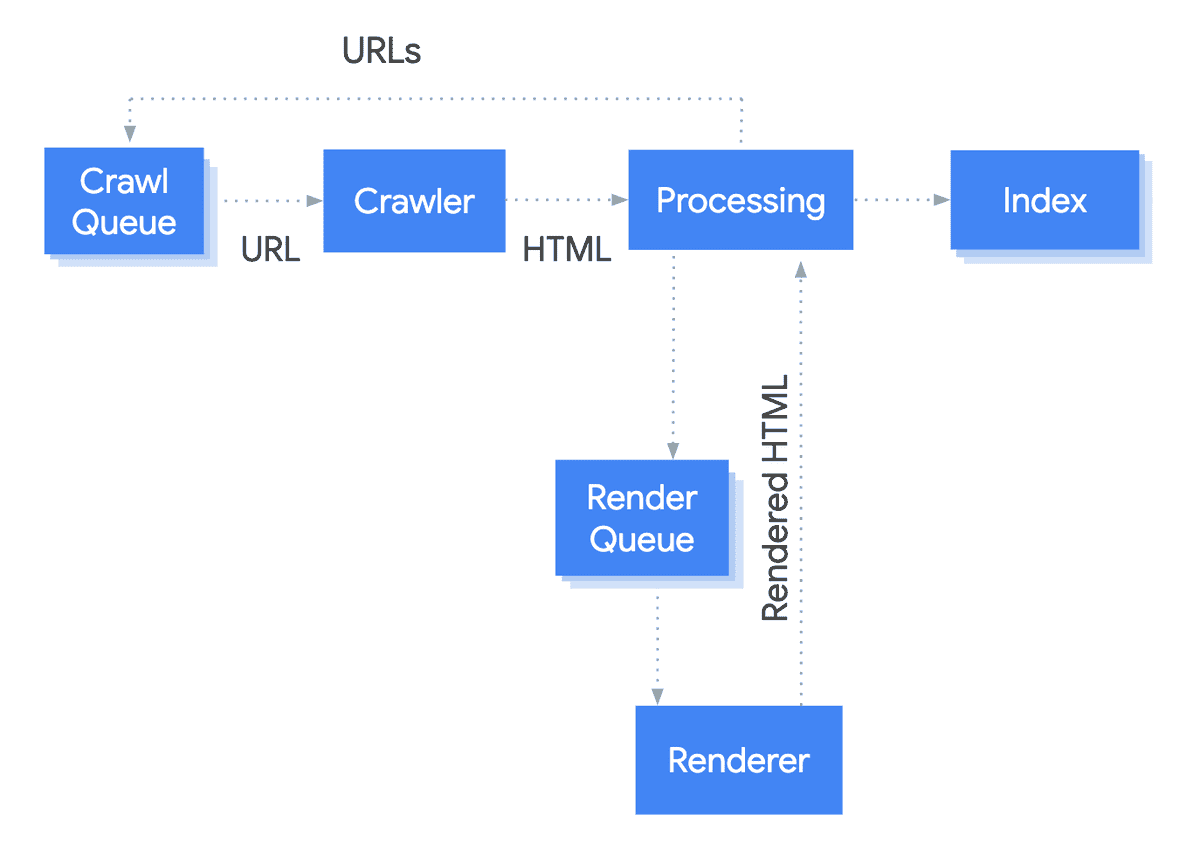
The important thing to note from this diagram is that the index gets updated after rendering. Additionally, consider that Google claim they basically render every single page they encounter.
This is important because it should affect how you think about (and potentially crawl) every website, not only the ones that have been built using a JavaScript framework.
Google's rendering advice
Google suggests starting with the basics when building a website. Use HTML to create the structure and navigation before making it look pretty and user-friendly with JavaScript.
Instead of relying solely on client-side JavaScript, Google recommends using server-side rendering, static rendering, or hydration to improve performance for users and search engine crawlers.
- Server-side rendering and pre-rendering mean that JavaScript execution is handled by the server - so the server generates an HTML version of the page, which is then delivered to users and search engines.
- Hydration and hybrid rendering allows you to combine server rendering and client-side rendering, where the server handles the initial page load and HTML, and non-critical elements are handled client-side.
Lots of JavaScript frameworks, like React or Angular Universal, can be used for server-side and hybrid rendering.
If changing the front-end code isn't an option, dynamic rendering can be used instead. This involves switching between client-side rendering for users and pre-rendered content for search engines. Google advise that dynamic rendering should only be considered a workaround, because it doesn't have the same benefits as the other methods for user experience and performance.
If you are working with a website that uses dynamic rendering, you can test how this works by switching the user-agent to Googlebot in the Sitebulb via the Robots settings.
Generally, if you are concerned that Google is not able to properly render and/or index your page content, your first port of call should be to check Google Search Console.
Additional resources
This post is about crawling JavaScript websites, so further depth on 'how rendering fits in with Google' will lead us down multiple rabbit-holes.
However, it is a deep, complex and interesting topic that absolutely deserves the attention of technical SEOs, so here is some more reading for you to enjoy:
- Does Google Index JavaScript
- Martin Splitt explains Source HTML vs. Rendered HTML (VIDEO)
- Rendering SEO manifesto – why JavaScript SEO is not enough
- Googlebot & JavaScript: A Closer Look at the WRS (VIDEO PRESENTATION)
How Sitebulb handles rendering
Sitebulb offers two different ways of crawling:
- HTML Crawler
- Chrome Crawler
The HTML Crawler uses the traditional method of downloading the source HTML and parsing it, without rendering JavaScript.
The Chrome Crawler utilizes headless Chromium (like Google) to render the page, then parse the rendered HTML. Since it takes time to compile and fire all the JavaScript in order to render the time, it is necessarily slower to crawl with the Chrome Crawler.
As we have mentioned above, however, some websites rely on client-side JavaScript and therefore can only be crawled with the Chrome Crawler.
Selecting the Chrome Crawler when setting up a new project, or in the crawler settings will allow you to crawl JavaScript sites.
Trying to crawl a JavaScript website without rendering
As a brief aside, we're first going to investigate what happens when you try to crawl a JavaScript website without rendering, which means selecting the 'HTML Crawler' in the settings.
Let's take a look...
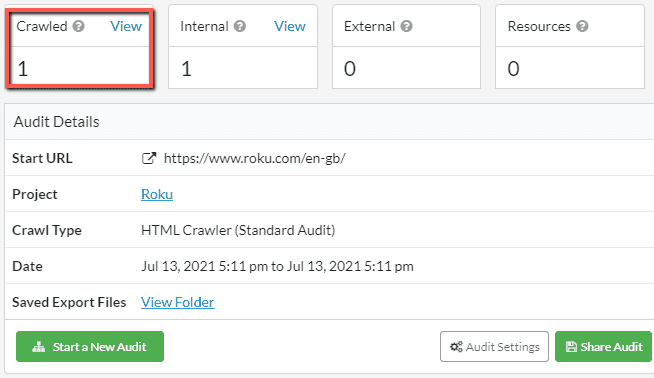
One page.
Why only one page? Because the response HTML (the stuff you can see with 'View Source') only contains a bunch of scripts and some fallback text.
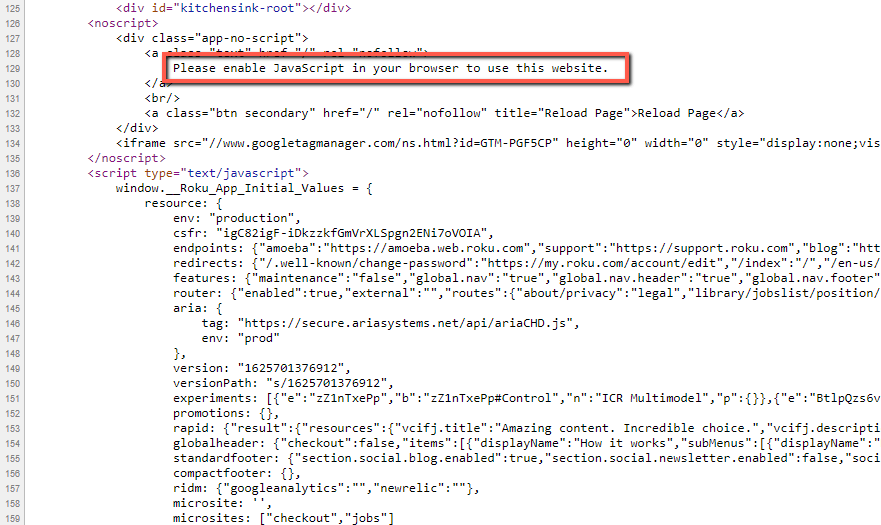
You simply can't see the meat and bones of the page - the product images, description, technical spec, video, and most importantly, links to other pages... everything a web crawler needs in order to understand your page content.
On websites like this you absolutely need to use the Chrome Crawler to get back any meaningful crawl data.
How to crawl a JavaScript website with Sitebulb
Every time you set up a new Project in Sitebulb, you have the option of setting it up to use the HTML Crawler or the Chrome Crawler. If you are crawling a JavaScript website, this is the first step you need to cover:
Secondly, you will also need to consider the render timeout, as this affects how much of the page content Sitebulb is actually able to access.
You will find this in the Crawler Settings on the left hand side, and the Render Timeout dropdown is right underneath 'Crawler Type' on the right.
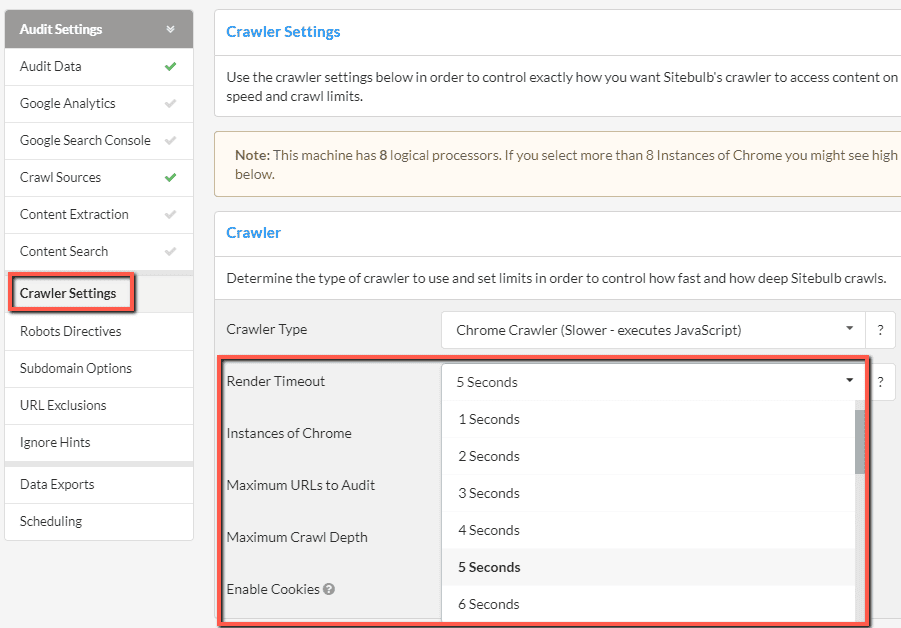
By default, this is set at 1 second, which is absolutely fine for most sites that do not have a high dependence on JavaScript. However, websites built using a JavaScript framework have a very high dependence on JavaScript, so this needs to be set with some care.
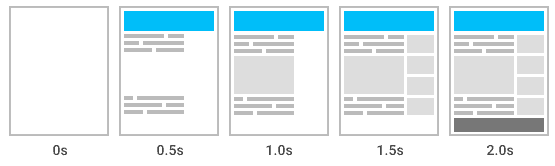
What is this render timeout?
The render timeout is essentially how long Sitebulb will wait for rendering to complete before taking an 'HTML snapshot' of each web page.
Justin Briggs, a highly technical SEO, published a post which is an excellent primer on handling JavaScript content for SEO, which will help us explain where the Render Timeout fits in.
I strongly advise you go and read the whole post, but at the very least, the screenshot below shows the sequence of events that occur when a browser requests a page that is dependent upon JavaScript rendered content:
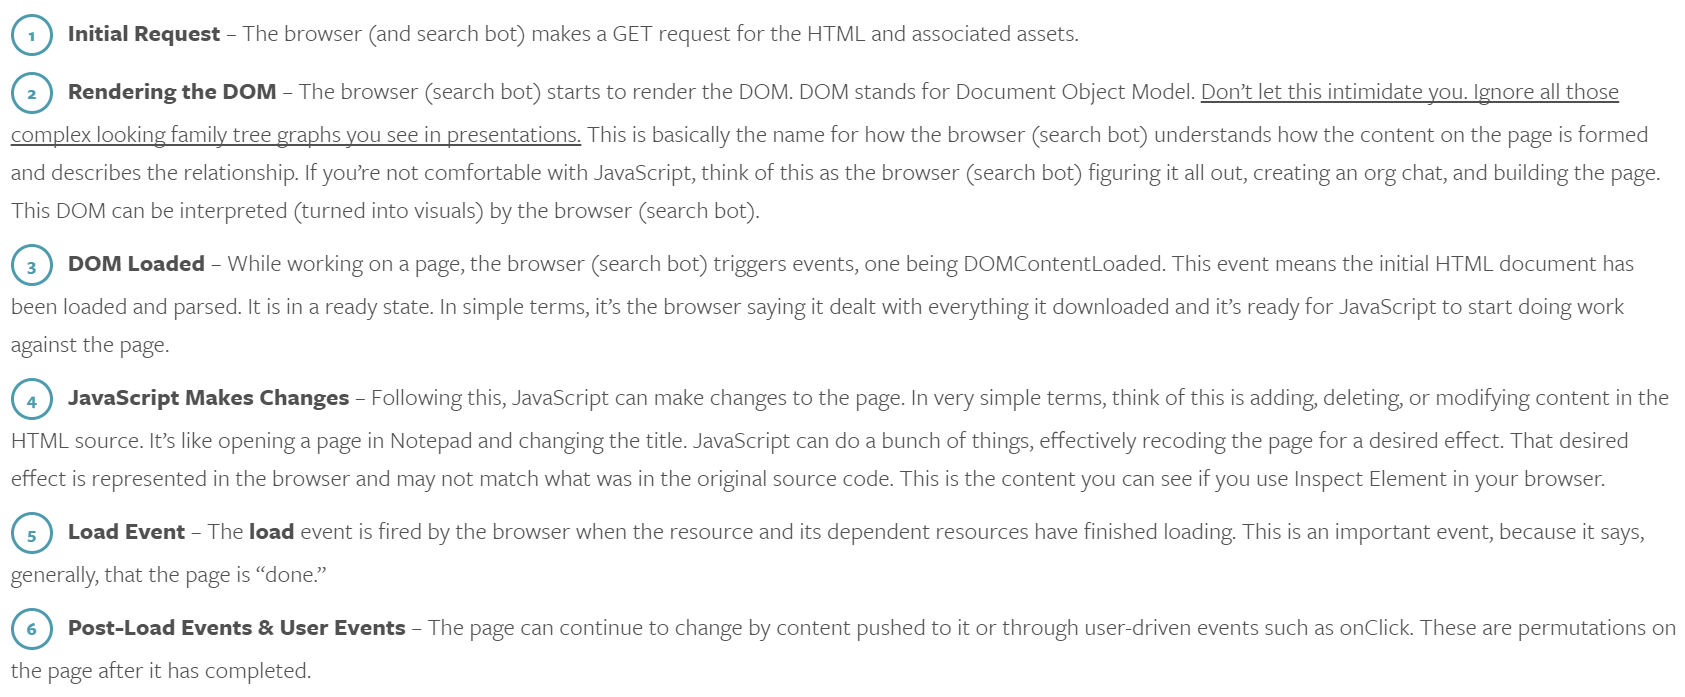
The 'Render Timeout' period used by Sitebulb starts just after #1, the Initial Request. So essentially, the render timeout is the time you need to wait for everything to load and render on the page. Say you have the Render Timeout set to 4 seconds, this means that the each page has 4 seconds for all the content to finish loading and any final changes to take effect.
Anything that changes after these 4 seconds will not be captured and recorded by Sitebulb.
Render timeout example
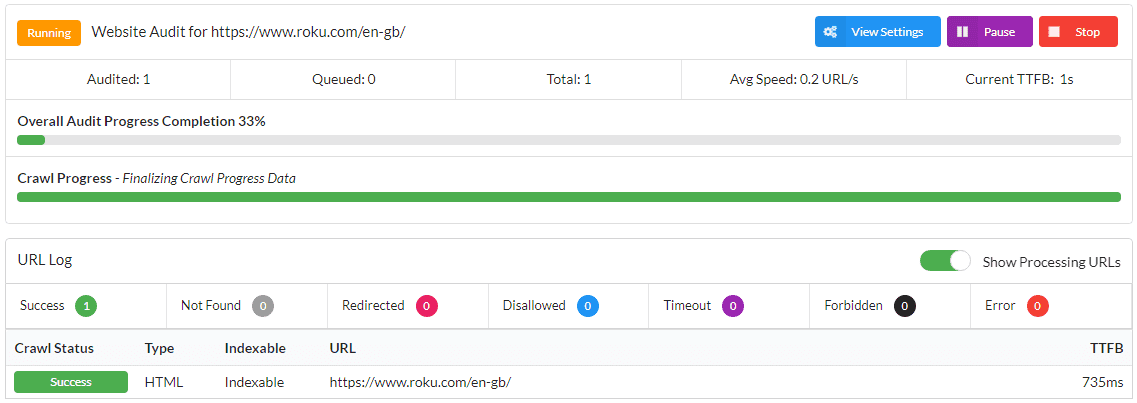
I'll demonstrate with an example, again using the Roku site we looked at earlier.
- In my first audit I used the HTML Crawler - 1 URL crawled
- In my second audit I used the Chrome Crawler with a 3 second render timeout - 139 URLs crawled
- In my third audit I used the Chrome Crawler was a 5 second render timeout - 144 URLs crawled

Digging into a little more detail about these two Chrome audits, there were 5 more internal HTML URLs found with the 5 second timeout. This means that, in the audit with a 3 second render timeout, the content which contains links to those URLs had not been loaded when Sitebulb took the snapshot.
I actually crawled it one more time after this with a 10 second render timeout, but there was no difference to the 5 second render timeout, which suggests that 5 seconds is sufficient to see all the content on this website.
On another example site, I experimented with not setting a render timeout at all, and crawling the site again with a 5 second timeout. Comparing the two Crawl Maps shows stark differences:
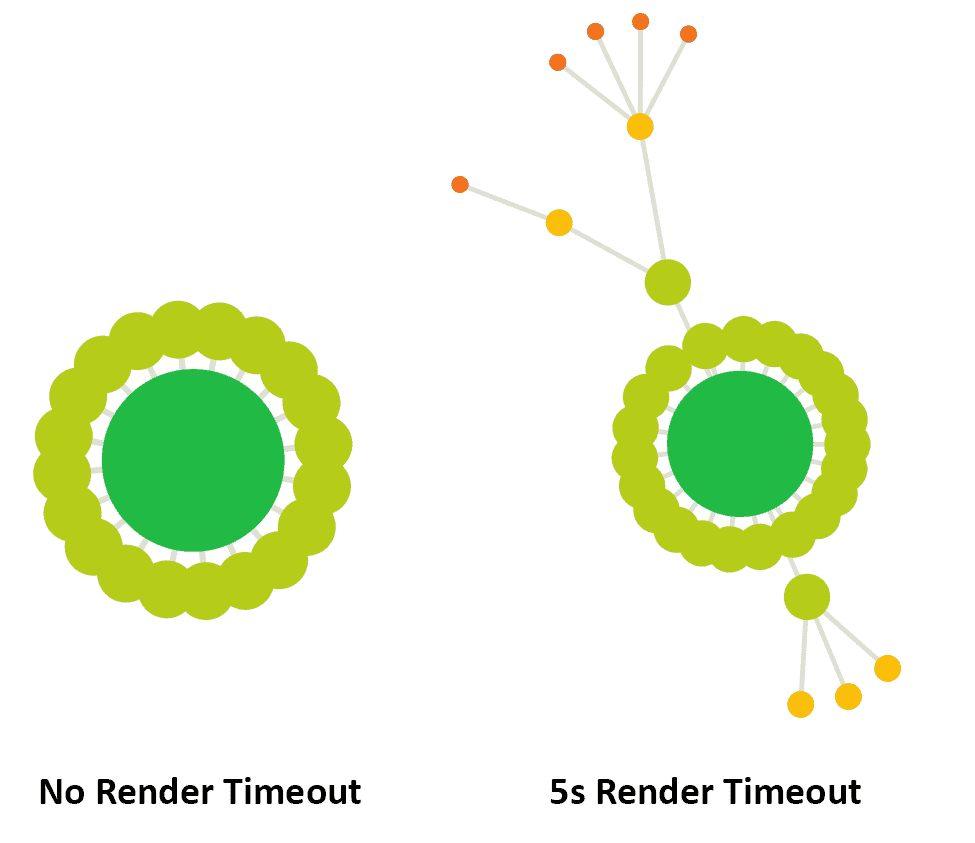
Clearly, this can have a profound impact upon your understanding of the website and its architecture, which underlines why it is very important to set the correct render timeout in order for Sitebulb to see all of the content.
Recommended render timeout
Understanding why the render timeout exists does not actually help us decide what to set it at.
Although Google have never published anything official about how long they wait for a page to render, most industry experts tend to concur that 5 seconds is generally considered to be 'about right.'
Either way, all this will show you is an approximation of what a search engine may be seeing. If you want to crawl ALL the content on your site, then you'll need to develop a better understanding of how the content on your website actually renders.
To do this, head to Chrome's DevTools Console. Right click on the page and hit 'Inspect', then select 'Network' from the tabs in the Console, and then reload the page. I've positioned the dock to the right of my screen to demonstrate:

Keep your eye on the waterfall graph that builds, and the timings that are recorded in the summary bar at the bottom:

So we have 3 times recorded here:
- DOMContentLoaded: 727 ms (= 0.727 s)
- Load: 2.42 s
- Finish: 4.24 s
You can find the definitions for 'DOMContentLoaded' and 'Load' from the image above that I took from Justin Briggs' post. The 'Finish' time is exactly that, when the content is fully rendered and any changes or asynchronous scripts have completed.
If the website content depends on JavaScript changes, then you really need to wait for the 'Finish' time, so use this as a rule of thumb for determining the render timeout.
Bear in mind that so far we've only looked at a single page. To develop a better picture of what's going on, you'd need to check a number of pages/page templates and check the timings for each one.
If you are going to be crawling with the Chrome Crawler, we urge you to experiment further with the render timeout so you can set your Projects up to correctly crawl all your content every time.
Rendering data from Google Tag Manager
Some SEOs use Google Tag Manager (GTM) in order to dynamically change on-page elements, either as a full-blown optimization solution, or as a proof-of-concept to justify budget for 'proper' dev work.
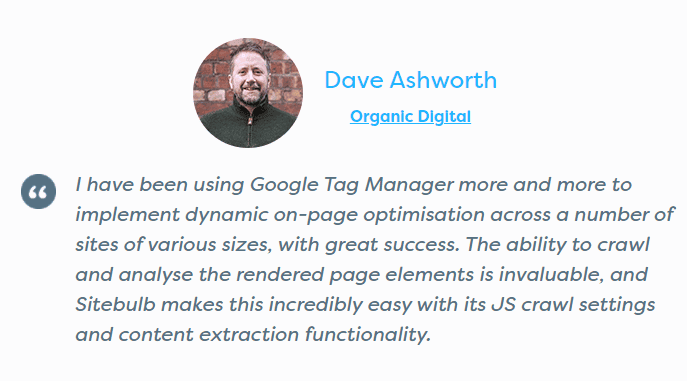
If you are unfamiliar with this, check out Dave Ashworth's post for Organic Digital - How To: Do Dynamic Product Meta Data in Magento Using GTM - which describes how he used GTM to dynamically re-write and localize the titles and meta descriptions for thousands of pages, with impressive results;
Most other web crawler tools won't be able to pick up the data inserted by GTM, which means they don't allow you to actually audit this data. This is because by default they block tracking scripts, which can have the affect of bloating audit data.
Here at Sitebulb, we have accounted for that too, and actually give you the option to turn this off, so you CAN collect on-page data dynamically inserted or changed using Google Tag Manager.
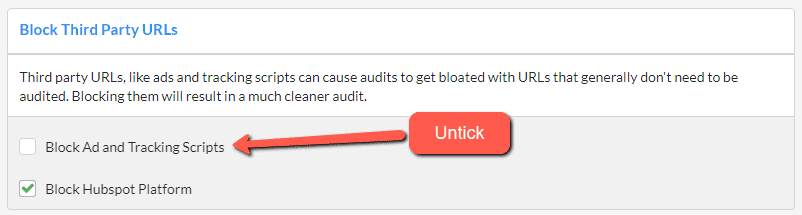
To do this, when setting up your audit, head over to the 'URL Exclusions' tab on the left hand menu:
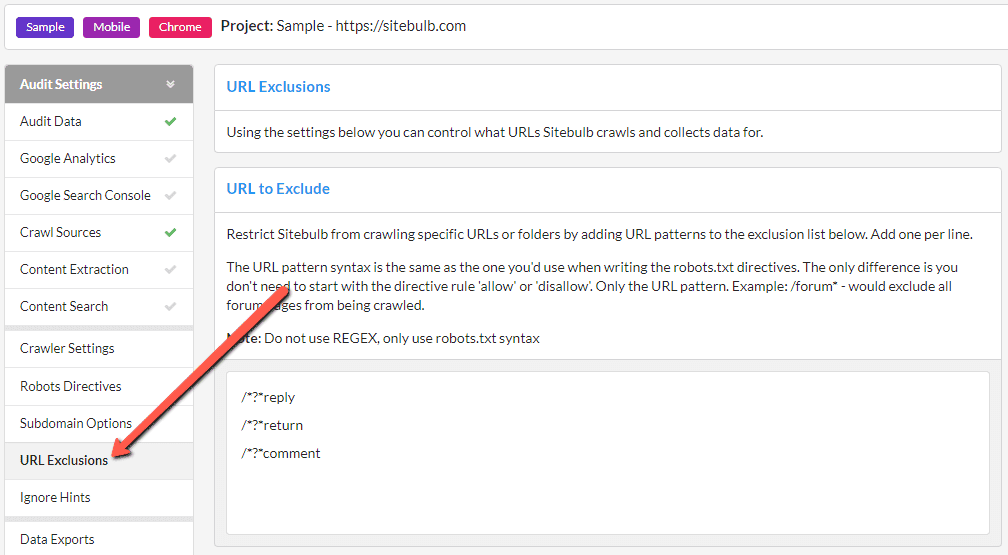
Then scroll alllllll the way down to the section entitled 'Block Third Party URLs', then you need to untick the option marked 'Block Ad and Tracking Scripts', which will always be ticked by default;
And then when you go ahead and crawl the site, Sitebulb will correctly extract the GTM-altered meta data. Note that you may need to tweak the render timeout.
Here is what Dave had to say about his experiences using Sitebulb in his auditing workflow:
Side effects of crawling with JavaScript
Almost every website you will ever see uses JavaScript to some degree - interactive elements, pop-ups, analytics codes, dynamic page elements... all controlled by JavaScript.
However, most websites do not employ JavaScript to dynamically alter the majority of the content on a given web page. For websites like this, there is no real benefit in crawling with JavaScript enabled. In fact, in terms of reporting, there is literally no difference at all:

And there are actually a couple of downsides to crawling with the Chrome Crawler, for example:
- Crawling with the Chrome Crawler means you need to fetch and render every single page resource (JavaScript, Images, CSS, etc...) - which is more resource intensive for both your local machine that runs Sitebulb, and the server that the website is hosted on.
- As a direct result of #1 above, crawling with the Chrome Crawler is slower than with the HTML Crawler, particularly if you have set a long render timeout. On some sites, and with some settings, it can end up taking 6-10 X longer to complete.
So, unless you need to crawl with the Chrome Crawler because the website uses a JavaScript framework, or because you specifically want to see how the website responds to a JavaScript crawler, it makes sense to crawl with the HTML Crawler by default.
Note: there is one other reason you would choose the Chrome Crawler, and that is if you want to audit Performance or Accessibility, both of which require the use of the Chrome Crawler.
How to detect JavaScript websites
In this post I've used the phrase 'JavaScript site' for brevity, where what I actually mean is 'websites that depend on JavaScript-rendered content.'
It is most likely that the type of websites you come across will be using one of the increasing popular JavaScript frameworks, such as:
- Angular
- React
- Embed
- Backbone
- Vue
- Meteor
If you are dealing with a website running one of these frameworks, it is important that you understand as soon as possible that you are dealing with a website that is fundamentally different from a non-JavaScript website.
Client briefing
Obviously the first port of call, you can save time doing discovery work with a thorough briefing with the client or their dev team.
However, whilst it is nice to think that every client briefing would give you this sort of information up front, I know from painful experience that they are not always forthcoming with seemingly obvious details...
Trying a crawl
Ploughing head first into an audit with the HTML Crawler is actually not going to cost you too much time, since even the most 'niche' websites have more than a single URL.
Whilst this would not mean that you're definitely dealing with a JavaScript website, it would be a pretty good indicator - at which point you could verify this with a JavaScript crawl. If Sitebulb can suddenly crawl the whole website, then you're definitely dealing with a site that needs JavaScript rendering.
It is certainly worth bearing in mind though, in case you are a set-it-and-forget-it type, or you tend to leave Sitebulb on overnight with a queue of websites to audit... by the morning you'd be bitterly disappointed.
Manual inspection
You can also use Google's tools to help you understand how a website is put together. Using Google Chrome, right click anywhere on a web page and choose 'Inspect' to bring up Chrome's DevTools Console.
Then hit F1 to bring up the Settings. Scroll down to find the Debugger, and tick 'Disable JavaScript.'
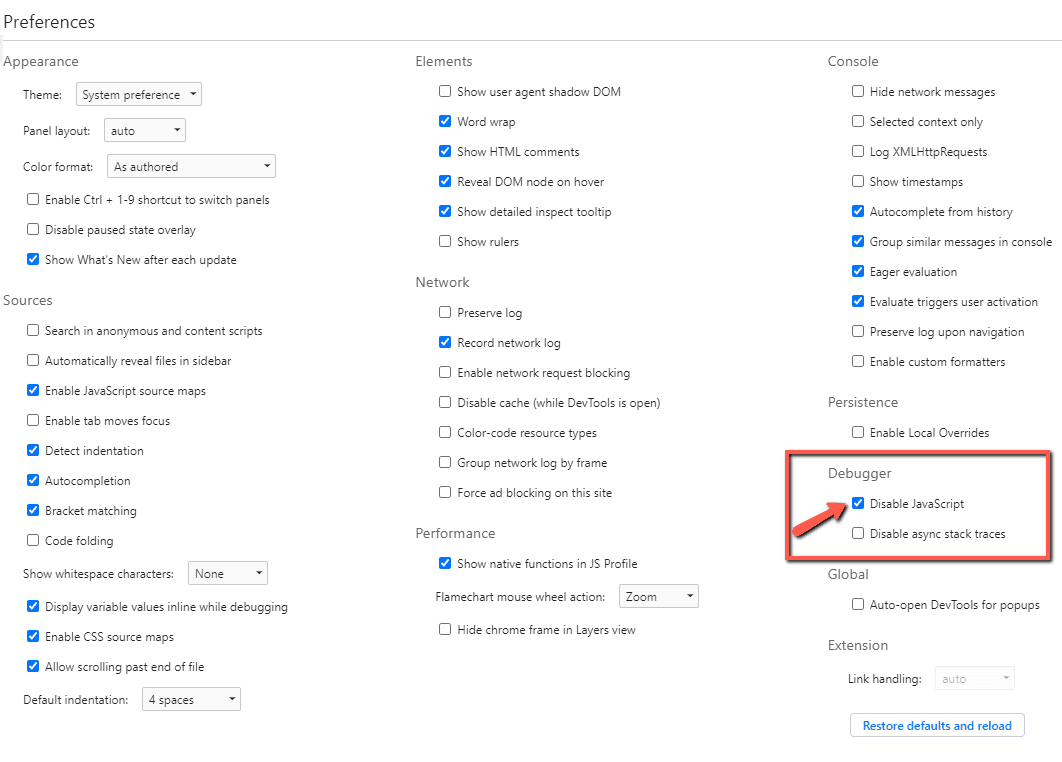
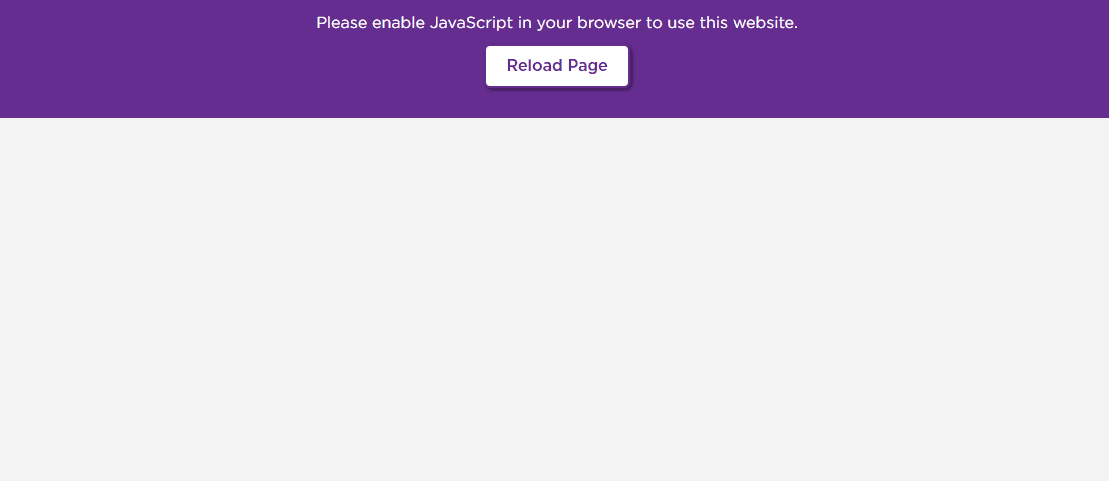
Then, leave the DevTools Console open and refresh the page. Does the content stay exactly the same, or does it all disappear?
The Roku site, for instance, provides extremely short shrift:
Using Sitebulb's technology report
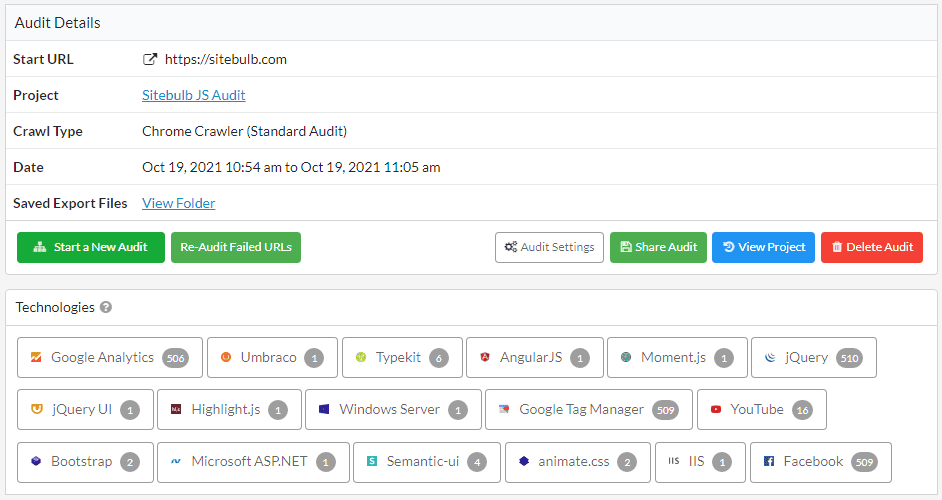
As you will see in the next section, we generally recommend crawling with the Chrome Crawler as part of the 'discovery' phase when doing website audits. If you do this, one of the things you will see on the audit overview is the 'Technologies' section, which will tell you exactly what technologies the pages are built with - including JavaScript frameworks like Angular and React.
How to detect JavaScript dependence
As we've covered already, HTML crawling is both quicker and less resource-intensive, so it does make sense to use this as your default option most of the time. In general, we find it is helpful to understand how a website is put together, and if there is little to no dependence on JavaScript on the site, you can be confident using the HTML Crawler for all your audits on that site.
We've also explored ways to identify 'JavaScript websites' where basically all the content is loaded in with JavaScript. But what about sites where only some of the content changes after rendering?
Our Roku example above is actually a pretty obvious example of a website not working with JavaScript disabled. But consider instead that some websites load only a portion of the content in with JavaScript (e.g. an image gallery) - on that sort of website if you only ever crawled with the HTML Crawler you could be missing out on an important chunk of data.
Comparing response vs rendered HTML
This is where you can make use of Sitebulb's unique report: Response vs Render, which is generated automatically whenever you use the Chrome Crawler.
What this does is render the page like normal, then runs a comparison of the rendered HTML against the response HTML (i.e. the 'View Source' HTML). It will check for differences in terms of all the important SEO elements:
- Meta robots
- Canonical
- Page title
- Meta description
- Internal links
- External links
Then the report in Sitebulb will show you if JavaScript has changed or modified any of these important elements:
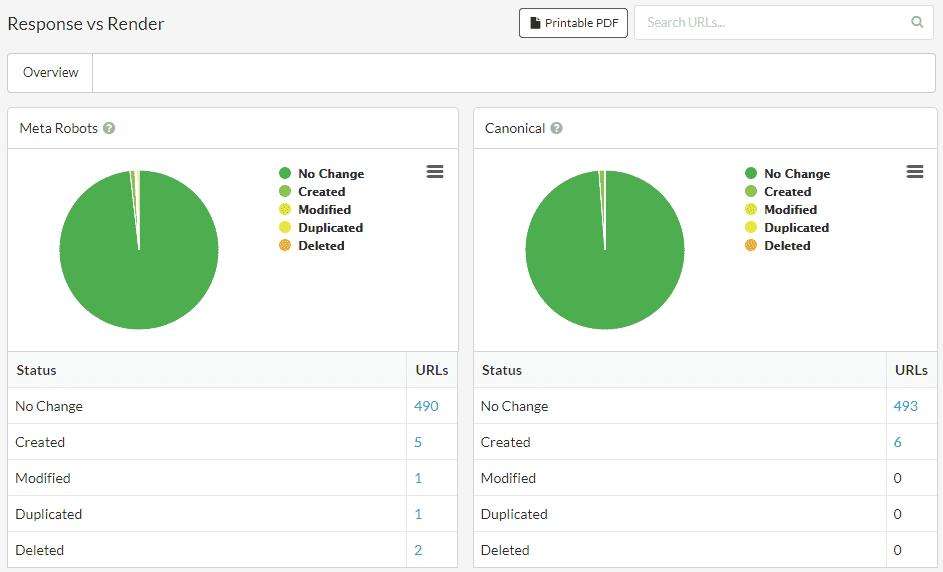
If every element is listed as 'No Change', the website has little to no dependence on JavaScript. If you see almost everything showing up as 'Created' or 'Modified', you are mostly likely dealing with a JavaScript framework or a single page application.
Often if it is not quite as clear-cut. If, for instance, the website didn't change the main content, but did insert JavaScript links, then you'd see 'No Change' for most of the sections but lots of links created or modified in the links section:
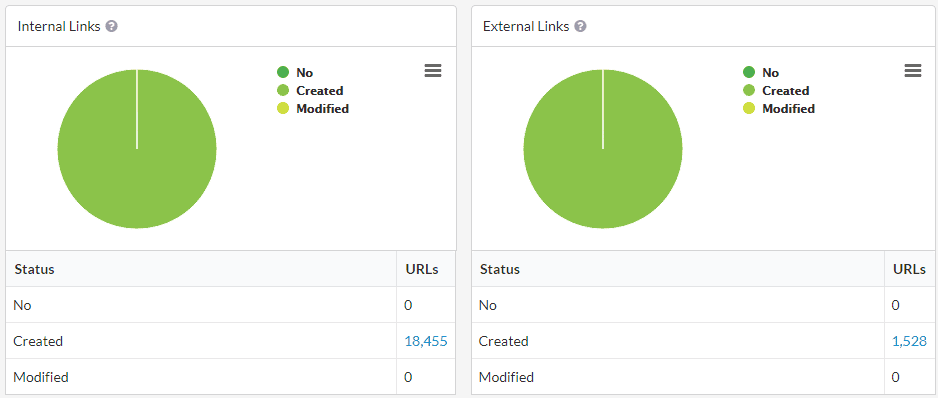
This reliance on JavaScript links means that if you DON'T crawl with JavaScript rendering, you will not be able to crawl the whole site.
For the most comprehensive understanding of how this report works, check out our response vs render comparison guide.
Include JavaScript in your 'discovery workflow'
When working on technical SEO for any new or unfamiliar website, part of your initial process involves discovery - what type of platform are they on, what kind of tracking/analytics are they using, how big is the website etc...
Our suggestion is that JavaScript should also enter this workflow, so you can be confident if rendering is required when crawling the site. Essentially the point of this is to determine the level of dependence upon JavaScript, and whether you need to render the pages in your audits moving forwards.
But also, knowing this could help you unpick issues with crawling or indexing, or affect how you tackle things like internal link optimization.
A simple workflow could look like this:
- Run an exploratory Sitebulb audit using the Chrome Crawler
- Analyze the Response vs Render report to see if JavaScript is affecting any of the content during rendering
- Include the results of this in your audit, and make a decision for future audits as to whether the Chrome Crawler is needed or not. Remember that you may need to render content even if the website is not using a JavaScript framework.
If you need further convincing that this is a good idea, just ask yourself 'what would Aleyda do...?

Further reading
We have a dedicated page with all the best resources for learning about JavaScript SEO, including guides, experiments and videos. Included below are some of our favourites for various topics.
Fundamental JavaScript SEO:
- Core Principles of SEO for JavaScript by Justin Briggs
- JavaScript & SEO: Making Your Bot Experience As Good As Your User Experience by Alexis Sanders
- JavaScript and SEO: The Difference Between Crawling and Indexing by Barry Adams
- The SEO's Introduction to Rendering by Jamie Alberico
Advanced JavaScript SEO:
- How to Diagnose and Solve JavaScript SEO Issues in 6 Steps by Tomek Rudzki
- Rendering on the Web – The SEO Version by Jan-Willem Bobbink
- "Rendering SEO" with Martin Splitt by Onely (Webinar)
- Rendering SEO Manifesto - Why we need to go beyond JavaScript SEO by Bartosz Góralewicz
- What We Do in the Shadow DOM by Jamie Alberico
Try out Sitebulb's JavaScript crawling
If you're looking for a way to crawl and render your own JavaScript site, you can download Sitebulb here, and try it free for 14 days.
You might also like:

Patrick spends most of his time trying to keep the documentation up to speed with Gareth's non-stop development. When he's not doing that, he can usually be found abusing Sitebulb customers in his beloved release notes.